Monday, April 27, 2009
Chocolate Caramel Almond Tart
Another favorite combination of mine is chocolate, caramel and nuts, and I'm probably not alone here. I made this tart for a dinner party recently because it's a guaranteed crowd-pleaser. It's got a deep, buttery caramel almond filling, and is topped off with a ganache glaze that pairs perfectly with lightly sweetened whipped cream. The crust is ultra-simple, and comes together in the food processor in minutes. I like to use whole, blanched almonds for the filling. If you can only find whole unblanched almonds, just plunge them into boiling water for about 20 seconds. Drain, then cool them. The skins should slip off easily in your fingertips. Whole almonds yield the best crunch, but you can also use slivered blanched almonds, which are more readily available. The dough for the crust can be made up to three days ahead and stored, well-wrapped, in the refrigerator.
Chocolate Caramel Almond Tart
Serves 8
Crust:
1 cup all-purpose flour
3 tablespoons granulated sugar
Pinch of salt
6 tablespoons unsalted butter, cut into 1/2-inch dice and chilled well
2 tablespoons ice-cold water
Caramel Almond Layer:
3/4 cup blanched whole almonds
1 cup granulated sugar
1/4 teaspoon fresh lemon juice
1/2 cup heavy cream
2 tablespoons unsalted butter
1/4 teaspoon salt
1 teaspoon vanilla extract
Chocolate Truffle Layer:
2 ounces bittersweet chocolate, chopped
1/3 cup heavy cream
1 tablespoon unsalted butter, cut into 3 pieces
1/2 teaspoon vanilla extract
Make the crust:
1. Place the flour, sugar and salt in the bowl of a food processor and pulse a few times to combine. Add the butter pieces and toss lightly to coat with flour. Blend the butter and flour with about five 1-second pulses or until the mixture is the texture of coarse meal with some of the butter pieces the size of peas. Sprinkle the water over the flour mixture and process continuously until the dough begins to clump together. Do not over-process; the dough should not form a ball.
2. Turn the dough out onto a work surface and shape it into a thick 4-inch wide disk. Wrap the dough in plastic wrap and chill until firm enough to roll, about 30 minutes.
3. Place unwrapped dough on a work surface that has been lightly dusted with flour. Using a rolling pin, roll the dough out into an 11-inch circle, lifting and rotating the dough often, while dusting the work surface and dough lightly with flour as necessary. Roll the dough up on the rolling pin and unroll it ove a 9-inch fluted tart pan with a removable bottom. Gently press the dough onto the bottom and up the sides of the pan. Roll the pin over the top of the pan to trim off the excess dough. Lightly prick the bottom of the dough with a fork at 1/2-inch intervals. Refrigerate the dough in the pan for 20 minutes to firm up the dough.
Bake the crust:
4. Heat the oven to 350 degrees F. Right before baking, line the dough with foil and cover with pie weights or dried beans. Place the tart pan on a baking sheet and bake for 20 minutes. Carefully lift the foil (along with the weights) out of the tart pan and bake the crust for 10 to 15 minutes longer, or until golden brown. Leave the oven on. Transfer the tart pan to a wire rack and cool completely.
Make the caramel layer:
5. Toast the almonds on a baking sheet for 8 to 12 minutes, until golden. Let the nuts cool, then coarsely chop them and set aside. Fill a cup with water and place a pastry brush in it (this will be used for washing down the sides of the pan to prevent crystallization).
6. In a clean, heavy-bottomed 2-quart saucepan, stir together the sugar, 1/4 cup water and lemon juice. Place the saucepan over medium-high heat and cook, occasionally washing down the sides of the pan to wash away sugar crystals, until the mixture starts to color around the edges. Gently swirl the pan to ensure that the sugar caramelizes evenly and turns a medium-dark amber color.
7. Remove the pan from the heat and carefully add the heavy cream--the mixture will bubble up furiously, so be careful. Once the bubbling has subsided, add the butter and stir until completely melted. Whisk in the salt, vanilla and chopped almonds and stir until the nuts are completely coated. Pour the hot caramel mixture into the cooled tart shell, using a spoon to make sure that the nuts are evenly distributed. Let the caramel cool for 30 minutes, then refrigerate until the caramel is chilled, about 1 hour.
Make the truffle layer:
8. Place the chocolate and cream in a small saucepan over low heat and, stirring occasionally, cook until the chocolate is melted. While still on low heat, add the butter and stir until it is melted and the mixture is smooth. Stir in the vanilla. Pour the warm mixture over the caramel layer and smooth it into an even layer that covers all of the caramel. Refrigerate for at least 1 hour, until the chocolate is set. Serve the tart with sweetened whipped cream or vanilla ice cream, if you like.
Saturday, April 18, 2009
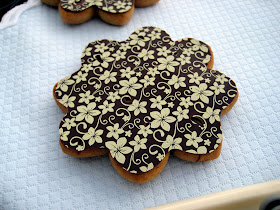
Chocolate-Coated Peanut Butter Cookies
Like many Americans, I love the combination of peanut butter and chocolate. I decided to create an upscale version of a cookie combining these flavors, and here it is. It's a simple peanut butter shortbread cookie which has been coated with tempered dark chocolate. I applied a transfer sheet square to the wet chocolate and then let the chocolate set. Then I just peeled off the transfer sheet, and voila! Instant pretty cookie!! Well, ok, not instant, but at least it looks like something that took some work. I did another version of this concept in The Good Cookie (John Wiley & Sons, 2002). That was a buttery almond shortbread cookie in a heart shape, with a polka-dot chocolate design on one side. One thing to keep in mind when doing a labor-intensive cookie like this: make it large, at least 3 inches. You don't want to be spending hours and hours making small cookies with this type of design. Transfer sheets are sold individually at Fancy Flours, or in bulk at Kerekes. There are hundreds of great designs to choose from. Here's the recipe:
Chocolate-Coated Peanut Butter Shortbread Cookies
Makes about eighteen 3-inch cookies
Storage: in an airtight container at room temperature for up to a week.
Special Equipment: 3-inch daisy-shaped cookie cutter; three 9 3/4-by-14 1/4-inch transfer sheets in the design of your choice
Peanut Butter Shortbread Cookies:
1 cup (2 sticks) unsalted butter, cut into tablespoons
1/2 cup granulated sugar
2/3 cup creamy peanut butter
1/4 teaspoon salt
1 teaspoon vanilla extract
2 cups all-purpose flour
Chocolate Coating:
18 ounces bittersweet couverture chocolate
1. In the bowl of an electric mixer, using the paddle attachment or beaters, beat the butter at medium speed for 1 minute, to soften it. Gradually add the sugar and beat until well blended, about 1 1/2 minutes. Add the peanut butter, salt, and vanilla extract and mix at medium-low speed until blended, scraping down the sides of the bowl as necessary with a rubber spatula. Add the flour at low speed, and mix just until blended. Turn the dough out onto a work surface and shape it into two discs. Wrap each disc in plastic wrap and refrigerate until chilled, about 2 hours (or up to 3 days).
2. Position a rack in the center of the oven and preheat to 300°F. Line two baking sheets with parchment paper.
3. Place one of the chilled dough discs on a lightly floured work surface. Using a rolling pin, roll the dough out to a thickness of 1/4 inch (be aware that rolling them thinner will change the baking time). Using a 3-inch daisy cookie cutter, cut out as many cookies from the dough as possible. Arrange the rounds on one of the prepared baking sheets, spacing them 3/4 inch apart. Gather up the scraps, rewrap them, and chill for about 15 minutes before re-rolling and cutting out more cookies. Bake the cookies for 14 to 16 minutes, until they are just firm, but not browned. Cool the cookies on the baking sheet for 10 minutes. Transfer them carefully to a wire rack and cool completely.
4. Repeat the rolling and cutting procedure with the remaining dough until all of it is used.
Apply the chocolate coating:
5. Cut the transfer sheets into thirty-two 3 1/2-inch squares (the squares don't need to be perfectly shaped).
6. Temper the chocolate.
7. Place a cookie, upside down on a wire rack. Using a small, offset metal spatula, spread an even layer (not too thick, not too thin) of tempered chocolate over the cookie to cover it, spreading it right up to the edge. Immediately press the cocoa butter pattern side of a transfer sheet square directly onto the chocolate, pressing firmly but gently so that the sheet touches the chocolate all over the surface of the cookie. Transfer the cookie (with its transfer sheet attached) onto another wire rack, chocolate side up. Repeat the coating process with the remaining cookies, and allow them to set at room temperature for 2 hours. (If your kitchen is warm, refrigerate the cookies for 1 hour instead.)
8. Gently peel the transfer sheet off of each cookie. Serve the cookies chocolate side up.